
Clearing out cached data on a Windows 10 machine can fix a surprising range of everyday annoyances.
What exactly is a cache?
A cache is essentially a fast, temporary storage layer. It might live in a reserved chunk of your RAM or on a dedicated piece of storage hardware. Put simply, a cache is any hardware or software component whose job is to hold onto data for quick reuse.
In computing terms, caching means keeping a local copy of data so it can be retrieved quickly the next time it's needed, instead of redoing an expensive task from scratch every single time.
Your web browser is a good real-world example. As you browse, it quietly saves local copies of images, scripts, and other page assets. The next time you visit that same site, the browser can pull those files from your drive instead of downloading them again — which is faster, and can also save data if your connection is slow or metered.
Windows does something similar with icons. Every executable file carries its own built-in icon, and rather than reading each one individually every time you open a folder, Windows keeps a pre-built cache of icons ready to go at startup.
Why bother clearing the Windows 10 cache?
Now that the concept makes sense, here's why you might actually want to clear it.
There are two common motivations: reclaiming disk space, and fixing glitches caused by stale or damaged cache data.
Reclaiming disk space isn't usually urgent, and for most people it isn't something to obsess over. That said, if you're running an SSD, keeping some breathing room free can help both its speed and its long-term lifespan, so clearing out temporary or cached files now and then is worth doing.
And because some caches can get corrupted (the icon cache is a classic case) or simply go stale (browser caches, for instance), clearing them out is sometimes the quickest fix for problems like missing icons or websites that won't load correctly.
How do you clear the cache on Windows 10?
Cache data isn't stored in one single place — it's scattered across several locations, and each type needs its own removal method. This article walks through the main ones.
Revo Uninstaller Pro, third-party software from VS Revo Group, includes several tools that can help with these tasks.
Types of cache covered in this guide:
- Browser cache
- Windows temporary files
- Windows Store cache
- Windows/File Explorer cache
- System Restore cache
- DNS cache
- ARP cache in Windows 10
Clearing browser cache with Revo Uninstaller Pro
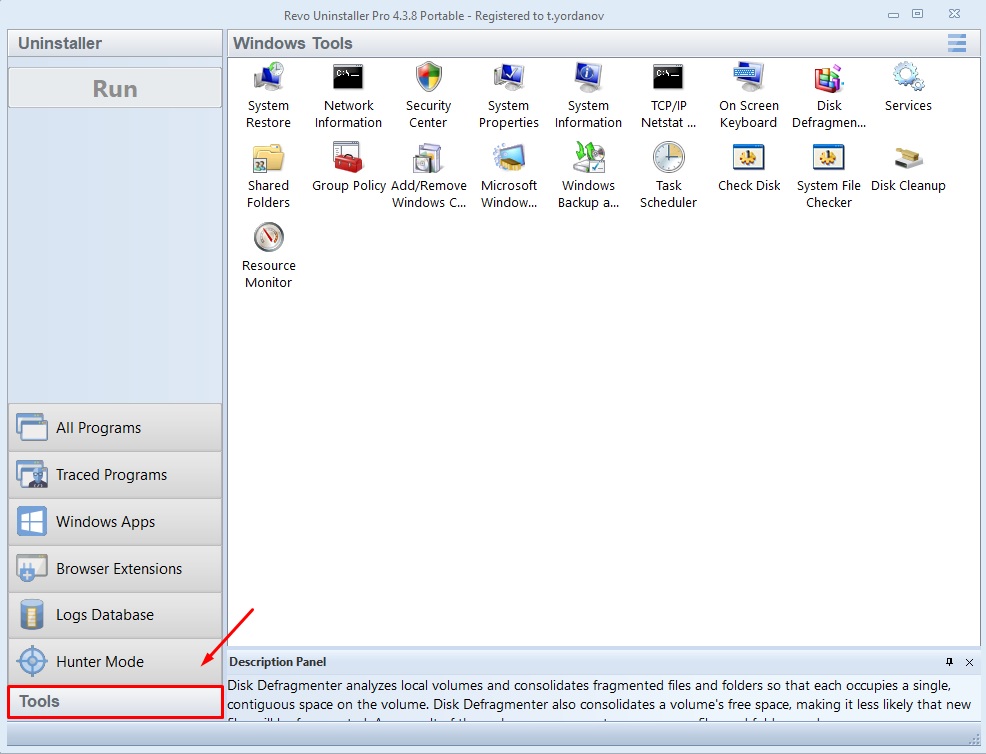
Revo Uninstaller Pro ships with a dedicated Browsers Cleaner module for wiping browser-related data, covering Internet Explorer, Edge, Mozilla Firefox, Google Chrome, and Opera.
- Launch Revo Uninstaller Pro and click Tools.
- Click History Cleaner.
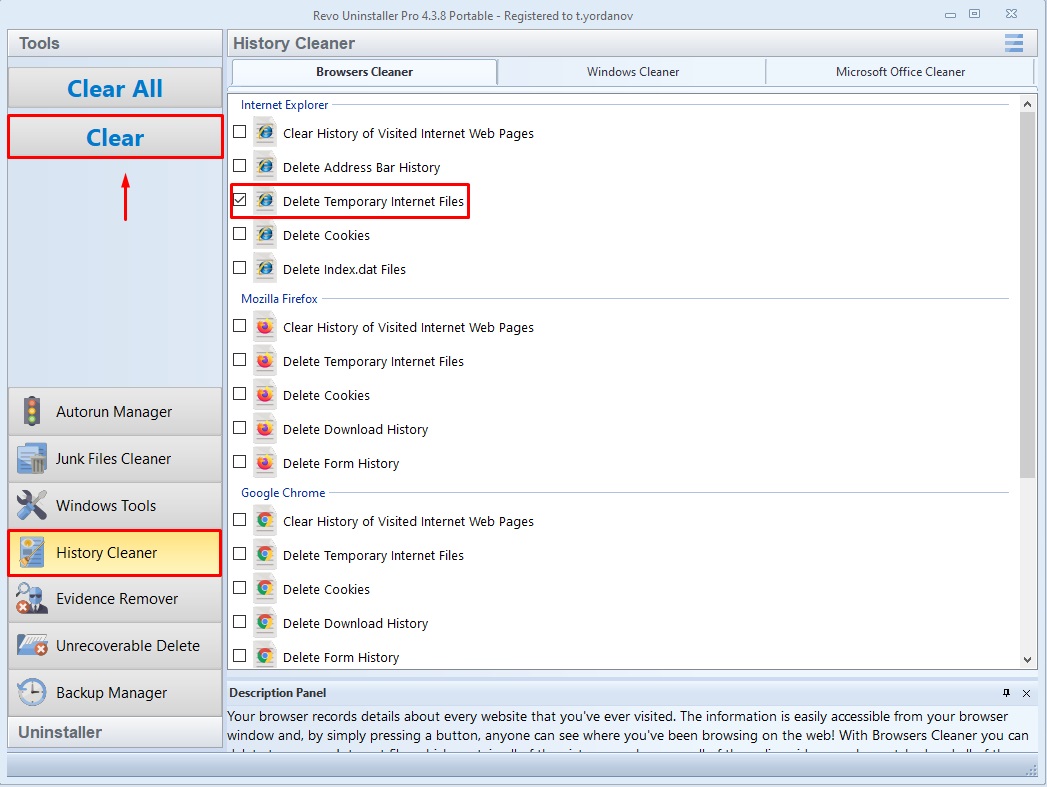
- Tick "Delete Temporary Internet files" for whichever browsers you want cleared, then click Clear.
Clearing browser cache with each browser's own settings
Every time you load a page, your browser stashes some files locally. Each browser has a built-in way to purge that data. Here's how to do it in the most common ones.
Google Chrome
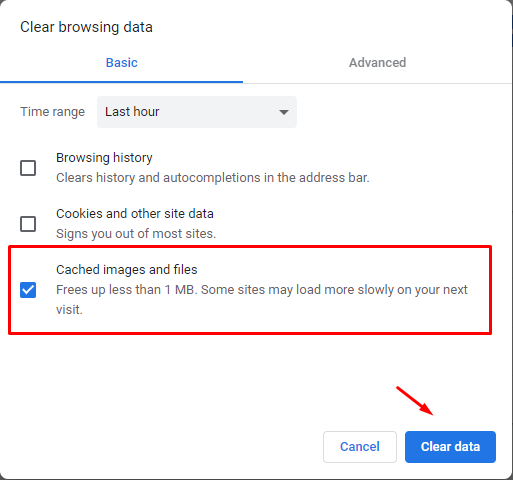
- Open Chrome, click the three-dot menu, then go to More tools > Clear browsing data.
- Set the time range to All time, check Cached images and files, then click Clear data to wipe the browser cache. Feel free to select other categories too if you'd like.
Mozilla Firefox
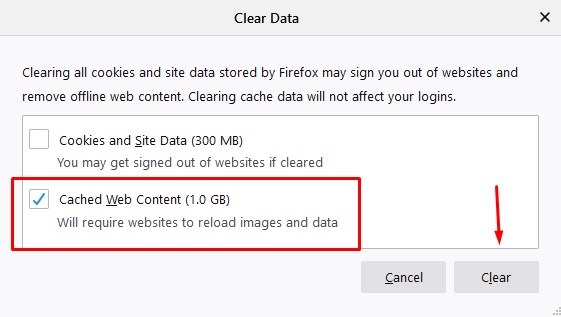
- Open Firefox, click the menu icon (three horizontal lines) in the top-right corner, and select Options.
- Go to Privacy and Security, scroll to "Cookies and Site Data," and click Clear Data….
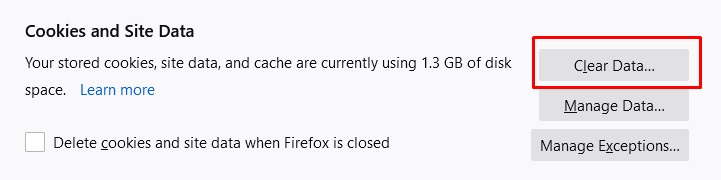
- Check Cached Web Content and click Clear.
Microsoft Edge
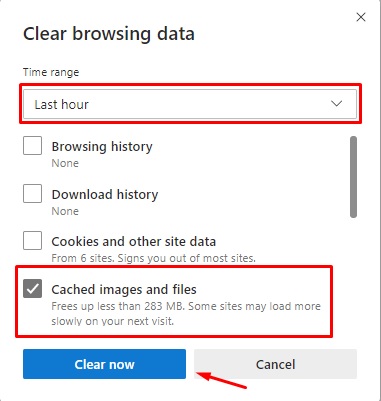
- Open Microsoft Edge and press Ctrl + Shift + Delete. In the "Clear browsing data" panel, choose a time range, check Cached images and files, and click Clear now.
Opera
- Open Opera and press Ctrl+H to bring up your history page.
- Click Clear browsing data in the upper-right corner.
- Pick a time range, check Cached images and files (plus anything else you'd like), and click Clear data.
Clearing Windows temporary files with Disk Cleanup
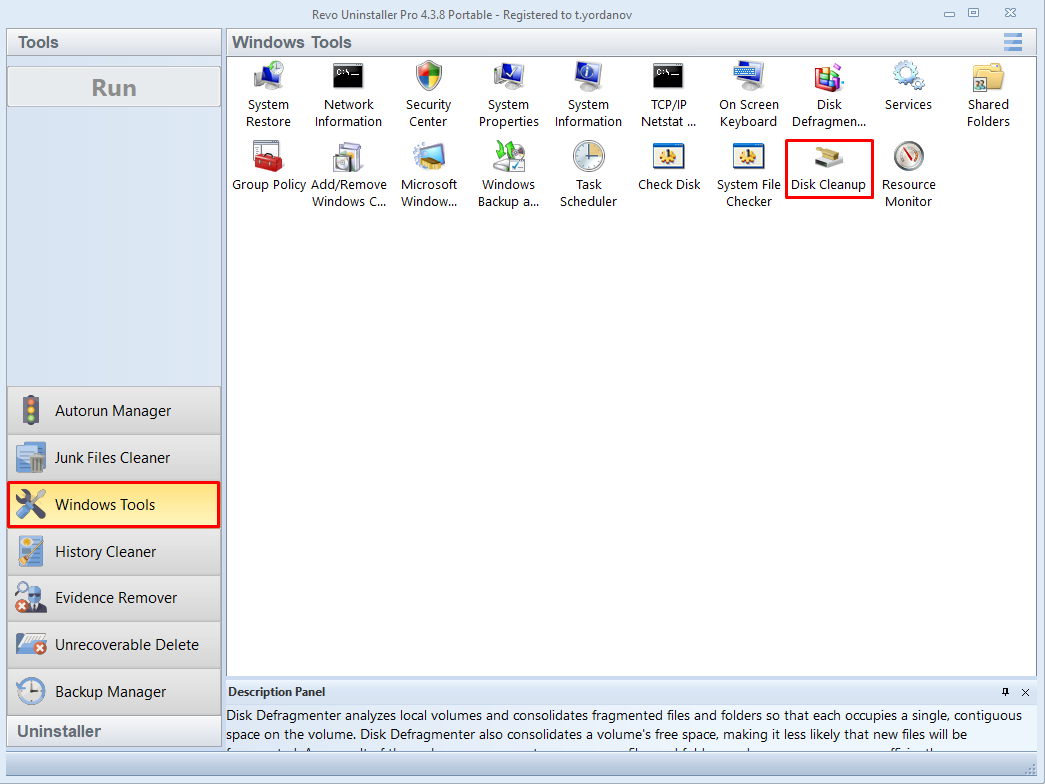
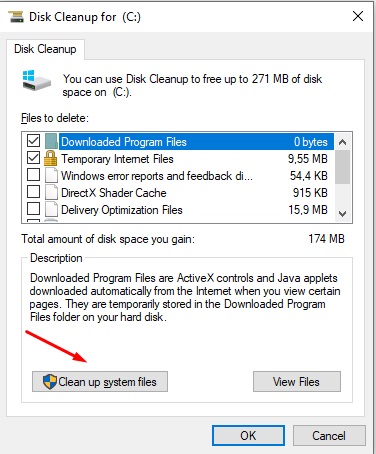
- Open Revo Uninstaller Pro, click Tools, then Windows tools, and double-click Disk Cleanup.
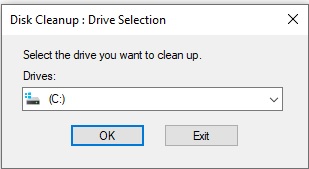
You can also reach Disk Cleanup directly: open the Start Menu (Win+S works too) and search for Disk Cleanup. - In the window that appears, pick the drive you'd like to clean from the drop-down and click OK.
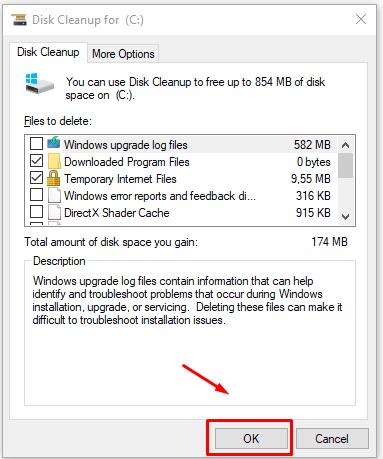
- Let the scan finish, then check off the items you want removed and click OK.
To also clean up system files/cache — not just user ones — click Clean up system files before checking anything; this triggers a second, deeper scan.
Clearing the Windows Store cache
- Press Win+R to bring up the Run dialog.
- Type "wsreset.exe" (no quotes) and press Enter or click OK.
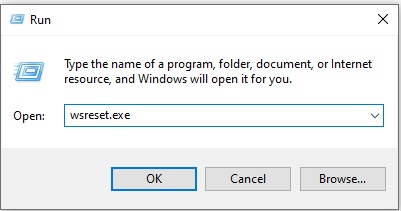
- Wait a moment — the Store will pop open automatically once the reset finishes.
Clearing File Explorer's caches
File Explorer (formerly Windows Explorer) keeps a few different caches. Some are easy to clear, while others take a bit more effort.
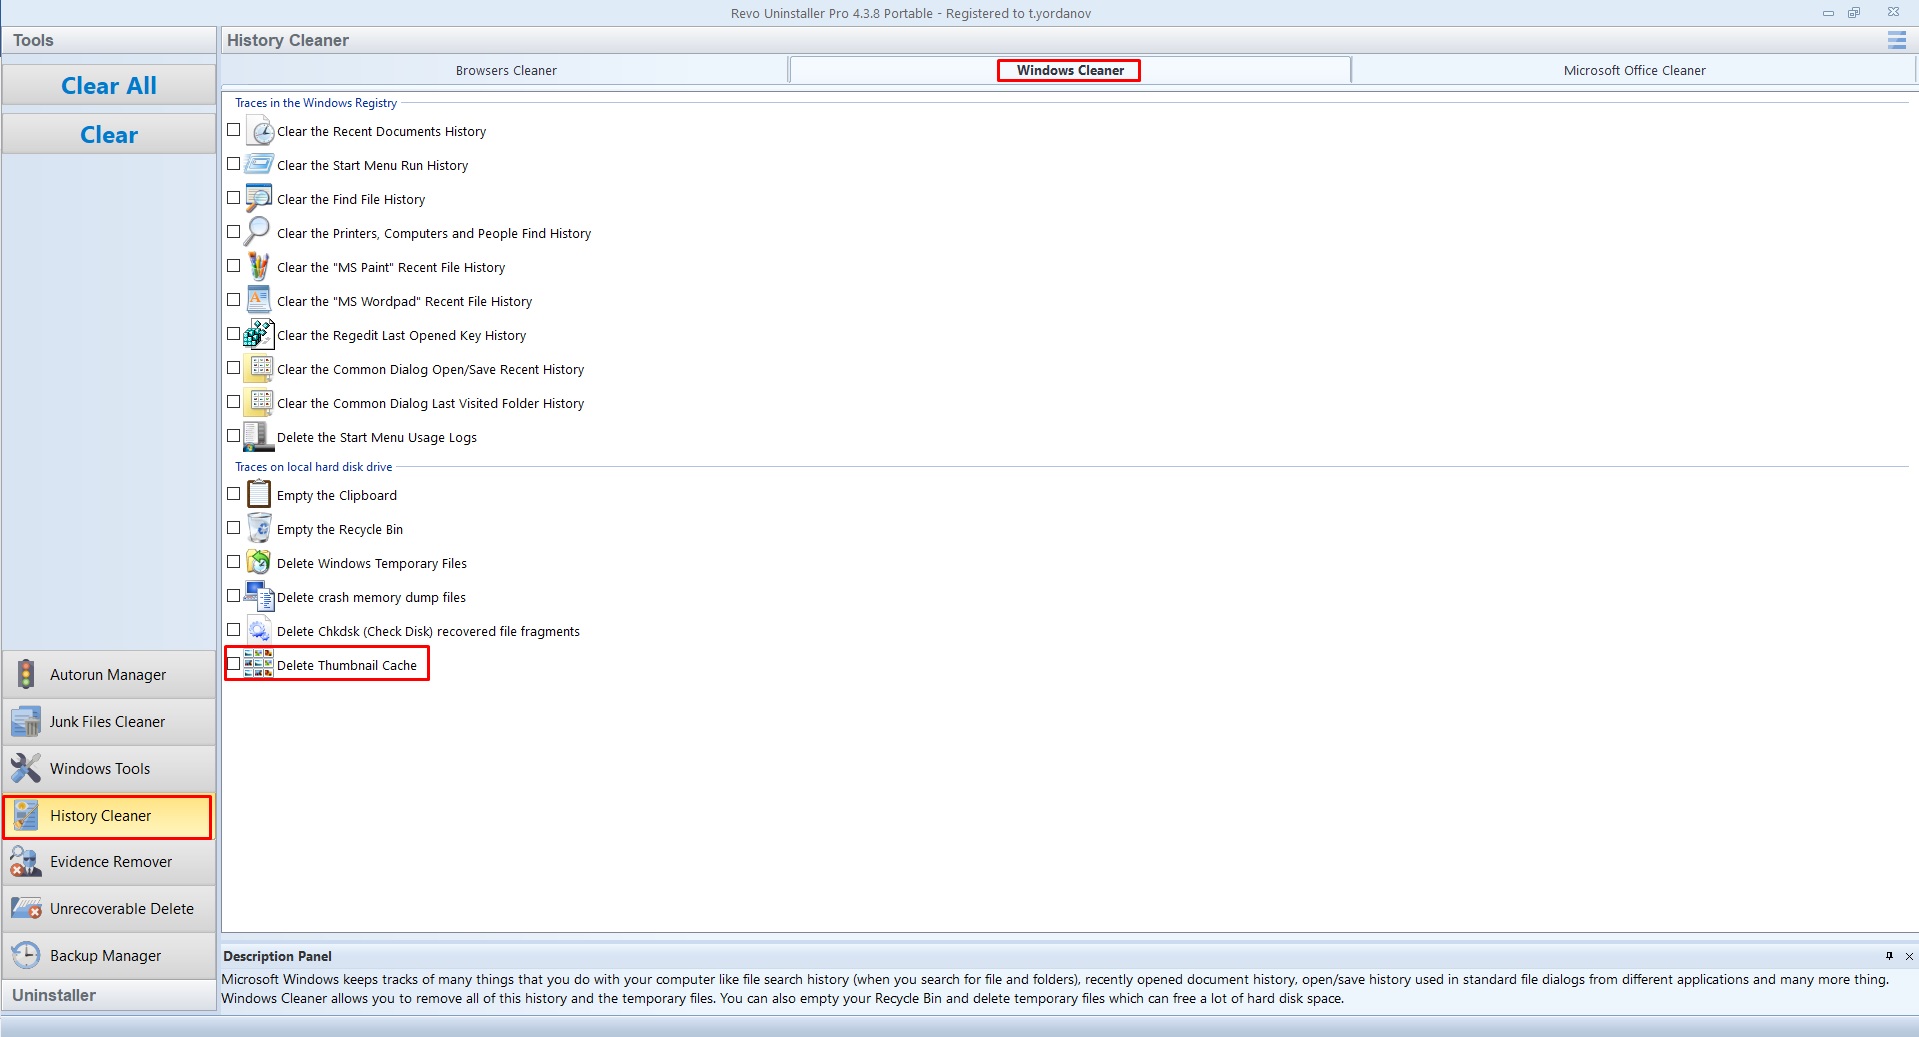
- Thumbnail cache: Open Revo Uninstaller Pro, click Tools, then History Cleaner, then Windows Cleaner. Check Delete Thumbnail Cache and click Clear.
- Icon cache: This one can't just be deleted while it's in use, since Explorer keeps it locked. A CMD script can automate the workaround.
Warning: save any open work before running the script below.
Download the file to a location you can find easily, right-click it, and choose Run as administrator. It will briefly close Explorer, wipe the icon cache files, and restart Explorer automatically. Other open programs shouldn't be affected, but it's still smart to save your work first just in case.
Restart your PC afterward to let the icon cache rebuild fully. - Windows Update cache: Also locked while in use, this cache needs a similar script-based approach. Download the file, right-click it, and choose Run as administrator. It stops the Windows Update service, clears out the cache folder, then restarts the service. A reboot afterward is a good idea but not strictly required.
- File Explorer history: Explorer also remembers recently opened files and past searches, which can raise privacy concerns on a shared PC. To clear it, open File Explorer, click the View tab, click Options on the ribbon, then click Clear in the window that opens.
Clearing the System Restore cache on Windows 10
System Restore takes periodic snapshots of key Registry entries and files, giving you a way to roll your PC back to an earlier state if something goes wrong. Because of this, it's a good habit to create a restore point before installing updates, drivers, or larger applications.
You can set a cap on how much disk space System Restore is allowed to use. Once that cap fills up, older restore points get dropped to make room for newer ones — but you can also clear them manually:
- Type "Create a restore point" (no quotes) into the taskbar search box and open the result.
- Select your system drive from the list and click Configure.
- In the window that opens, click Delete.
This removes every restore point currently stored for that drive.
Clearing the DNS cache
Trouble loading a particular website can sometimes trace back to a stale or corrupted DNS record on your PC. If that's the culprit, flushing the DNS cache is a quick fix.
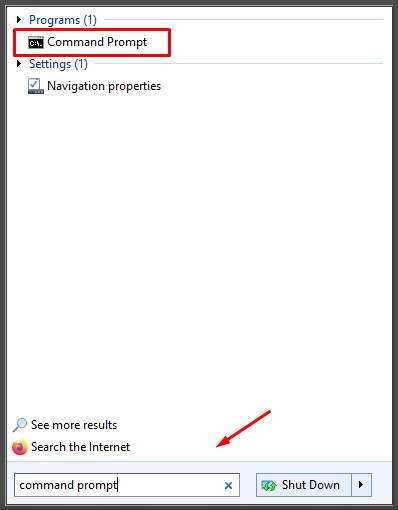
- Open the Start Menu, type "cmd" (no quotes) in the search box, and launch the result.
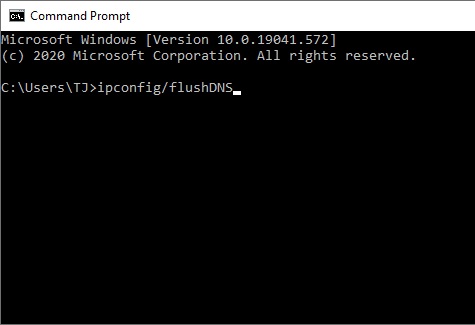
- In the Command Prompt window, type "ipconfig /flushdns" (no quotes) and press Enter.
Clearing the ARP cache in Windows 10
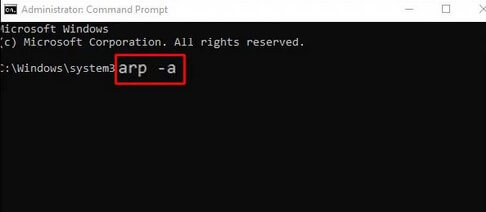
- Type
cmdinto the Windows search bar, right-click the Command Prompt result, and choose Run as administrator. - This opens a Command Prompt with elevated privileges.
- To view the current ARP cache, type
arp -a.
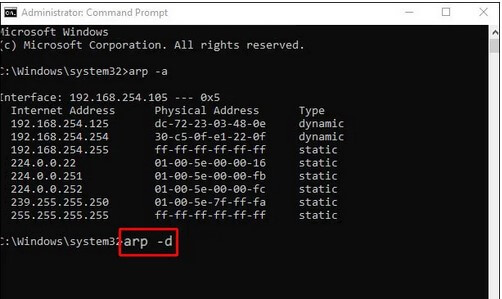
- To clear it, type
arp -d. The -a flag displays the cache, and -d wipes it.
There's no single button for clearing every cache on a Windows 10 PC, but tools like Revo Uninstaller Pro can handle most of the common ones in a few clicks. Clearing caches solves a lot of everyday glitches, but if performance issues persist after trying these steps, it's worth digging further into what else might be slowing your system down.

No Comments